Drawing Paths and Shapes — SwiftUI Tutorials | Apple Developer Documentation
创建数据模型
创建数据模型,管理六边形六个线段的数据:
swift
import CoreGraphics
import Foundation

// 六边形
struct HexagonParameters {
    // segment用来管理六边形一边的三个点
    struct Segment {
        let line: CGPoint
        let curve: CGPoint
        let control: CGPoint
    }
    static let segments = [
        Segment(
            line: CGPoint(x: 0.60, y: 0.05),
            curve: CGPoint(x: 0.40, y: 0.05),
            control: CGPoint(x: 0.50, y: 0.00)
        ),
        Segment(
            line: CGPoint(x: 0.05, y: 0.20),
            curve: CGPoint(x: 0.00, y: 0.30),
            control: CGPoint(x: 0.00, y: 0.25)
        ),
        Segment(
            line: CGPoint(x: 0.00, y: 0.70),
            curve: CGPoint(x: 0.05, y: 0.80),
            control: CGPoint(x: 0.00, y: 0.75)
        ),
        Segment(
            line: CGPoint(x: 0.40, y: 0.95),
            curve: CGPoint(x: 0.60, y: 0.95),
            control: CGPoint(x: 0.50, y: 1.00)
        ),
        Segment(
            line: CGPoint(x: 0.95, y: 0.80),
            curve: CGPoint(x: 1.00, y: 0.70),
            control: CGPoint(x: 1.00, y: 0.75)
        ),
        Segment(
            line: CGPoint(x: 1.00, y: 0.30),
            curve: CGPoint(x: 0.95, y: 0.20),
            control: CGPoint(x: 1.00, y: 0.25)
        )
    ]
}
import CoreGraphics
import Foundation
// 六边形
struct HexagonParameters {
// segment用来管理六边形一边的三个点
struct Segment {
let line: CGPoint
let curve: CGPoint
let control: CGPoint
}
static let segments = [
Segment(
line: CGPoint(x: 0.60, y: 0.05),
curve: CGPoint(x: 0.40, y: 0.05),
control: CGPoint(x: 0.50, y: 0.00)
),
Segment(
line: CGPoint(x: 0.05, y: 0.20),
curve: CGPoint(x: 0.00, y: 0.30),
control: CGPoint(x: 0.00, y: 0.25)
),
Segment(
line: CGPoint(x: 0.00, y: 0.70),
curve: CGPoint(x: 0.05, y: 0.80),
control: CGPoint(x: 0.00, y: 0.75)
),
Segment(
line: CGPoint(x: 0.40, y: 0.95),
curve: CGPoint(x: 0.60, y: 0.95),
control: CGPoint(x: 0.50, y: 1.00)
),
Segment(
line: CGPoint(x: 0.95, y: 0.80),
curve: CGPoint(x: 1.00, y: 0.70),
control: CGPoint(x: 1.00, y: 0.75)
),
Segment(
line: CGPoint(x: 1.00, y: 0.30),
curve: CGPoint(x: 0.95, y: 0.20),
control: CGPoint(x: 1.00, y: 0.25)
)
]
}绘制badage
创建swiftui页面
1). 创建
- 创建swiftui文件,
BadgeBackground.swift - 增加path形状
- 用fill修饰器,将修饰器转换成视图
您可以使用路径来组合线条line、曲线curves和其他绘图基元,以形成更复杂的形状,如徽章的六边形背景。
swift
import SwiftUI

struct BadgeBackground: View {
    var body: some View {
        Path { path in

        }.fill(.black)
    }
}

struct BadgeBackground_Previews: PreviewProvider {
    static var previews: some View {
        BadgeBackground()
    }
}
import SwiftUI
struct BadgeBackground: View {
var body: some View {
Path { path in
}.fill(.black)
}
}
struct BadgeBackground_Previews: PreviewProvider {
static var previews: some View {
BadgeBackground()
}
}2). 绘制点
- 增加一个起始点,假设容器大小为100x100
- 为形状数据的每个点画线,以创建一个大致的六边形
swift
struct BadgeBackground: View {
var body: some View {
Path { path in
var width: CGFloat = 100
var height: CGFloat = 100
path.move(to: CGPoint(x: width * 0.95, y: height * 0.20))
struct BadgeBackground: View {
var body: some View {
Path { path in
var width: CGFloat = 100
var height: CGFloat = 100
path.move(to: CGPoint(x: width * 0.95, y: height * 0.20))
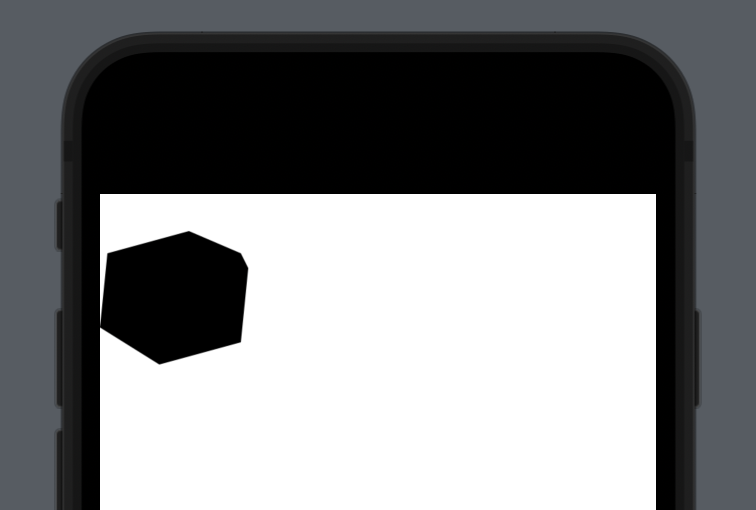
3). 绘图调整
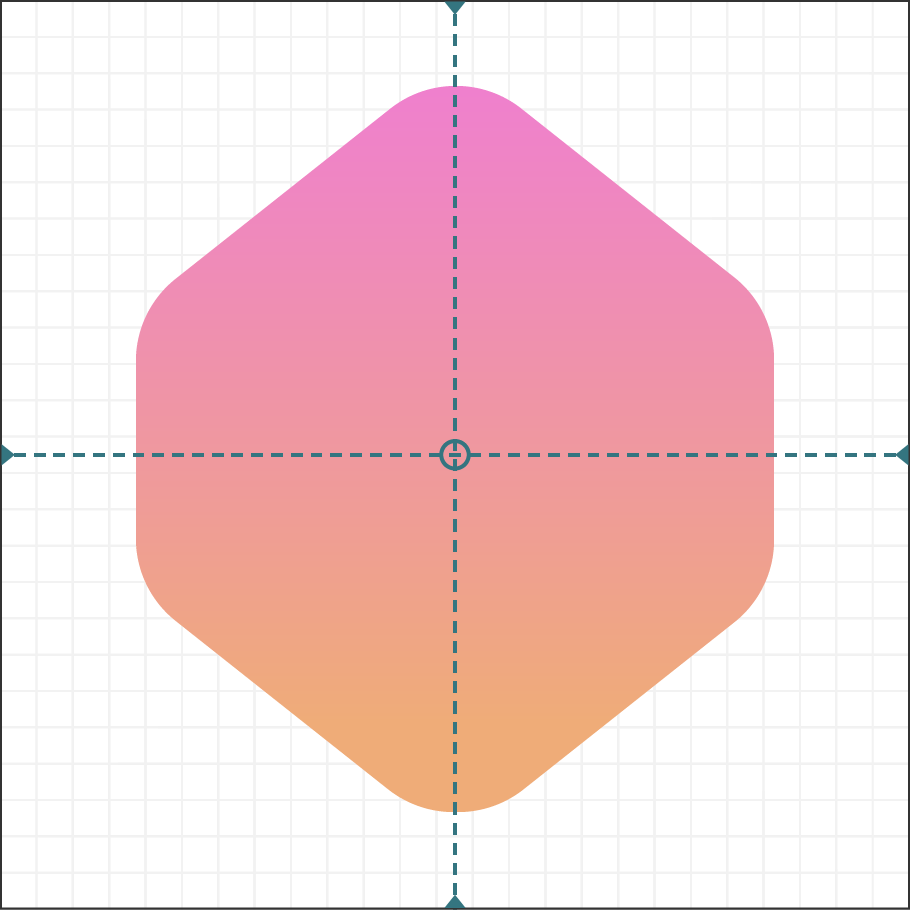
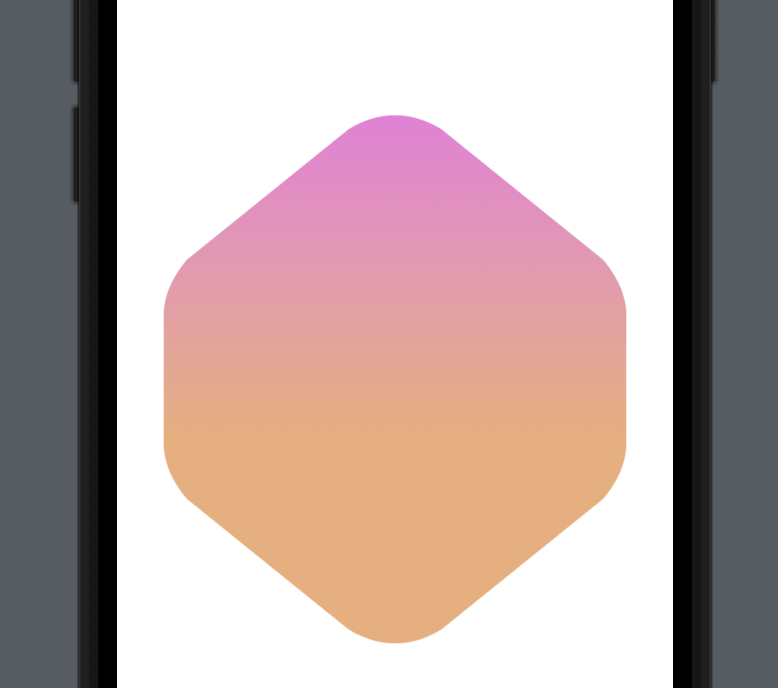
当前显示的比较难看,原因是忽略了形状弯曲的部分。接下来说使用addQuadCurve绘制贝塞尔曲线等操作。
swift
import SwiftUI

struct BadgeBackground: View {
    static let gradientStart = Color(red: 239.0 / 255, green: 120.0 / 255, blue: 221.0 / 255)
    static let gradientEnd = Color(red: 239.0 / 255, green: 172.0 / 255, blue: 120.0 / 255)

    var body: some View {
        // 使用GeometryReader包裹路径没这样badge就可以使用容器视图的大小,而不是硬编码的100大小
        GeometryReader { geometry in
            Path { path in
                // 取最小值,以便不超出屏幕
                var width: CGFloat = min(geometry.size.width, geometry.size.height)
                let height = width
                // 在x轴上缩放图形。否则会撑满整个图形
                let xScale: CGFloat = 0.832
                let xOffset = (width * (1.0 - xScale)) / 2.0
                width *= xScale
                path.move(
                    to: CGPoint(
                        x: width * 0.95 + xOffset,
                        y: height * (0.20 + HexagonParameters.adjustment)
                    )
                )

                HexagonParameters.segments.forEach { segment in
                    path.addLine(
                        to: CGPoint(
                            x: width * segment.line.x + xOffset,
                            y: height * segment.line.y
                        )
                    )

                    // 绘制贝塞尔曲线
                    path.addQuadCurve(
                        to: CGPoint(
                            x: width * segment.curve.x + xOffset,
                            y: height * segment.curve.y
                        ),
                        control: CGPoint(
                            x: width * segment.control.x + xOffset,
                            y: height * segment.control.y
                        )
                    )
                }
            }
            // 将纯黑色背景替换为与设计相匹配的渐变色。
            // .fill(.black)
            .fill(.linearGradient(
                Gradient(colors: [Self.gradientStart, Self.gradientEnd]),
                startPoint: UnitPoint(x: 0.5, y: 0),
                endPoint: UnitPoint(x: 0.5, y: 0.6)
            ))
        }
        .aspectRatio(1, contentMode: .fit)
    }
}

struct BadgeBackground_Previews: PreviewProvider {
    static var previews: some View {
        BadgeBackground()
    }
}
import SwiftUI
struct BadgeBackground: View {
static let gradientStart = Color(red: 239.0 / 255, green: 120.0 / 255, blue: 221.0 / 255)
static let gradientEnd = Color(red: 239.0 / 255, green: 172.0 / 255, blue: 120.0 / 255)
var body: some View {
// 使用GeometryReader包裹路径没这样badge就可以使用容器视图的大小,而不是硬编码的100大小
GeometryReader { geometry in
Path { path in
// 取最小值,以便不超出屏幕
var width: CGFloat = min(geometry.size.width, geometry.size.height)
let height = width
// 在x轴上缩放图形。否则会撑满整个图形
let xScale: CGFloat = 0.832
let xOffset = (width * (1.0 - xScale)) / 2.0
width *= xScale
path.move(
to: CGPoint(
x: width * 0.95 + xOffset,
y: height * (0.20 + HexagonParameters.adjustment)
)
)
HexagonParameters.segments.forEach { segment in
path.addLine(
to: CGPoint(
x: width * segment.line.x + xOffset,
y: height * segment.line.y
)
)
// 绘制贝塞尔曲线
path.addQuadCurve(
to: CGPoint(
x: width * segment.curve.x + xOffset,
y: height * segment.curve.y
),
control: CGPoint(
x: width * segment.control.x + xOffset,
y: height * segment.control.y
)
)
}
}
// 将纯黑色背景替换为与设计相匹配的渐变色。
// .fill(.black)
.fill(.linearGradient(
Gradient(colors: [Self.gradientStart, Self.gradientEnd]),
startPoint: UnitPoint(x: 0.5, y: 0),
endPoint: UnitPoint(x: 0.5, y: 0.6)
))
}
.aspectRatio(1, contentMode: .fit)
}
}
struct BadgeBackground_Previews: PreviewProvider {
static var previews: some View {
BadgeBackground()
}
}最终效果如图:
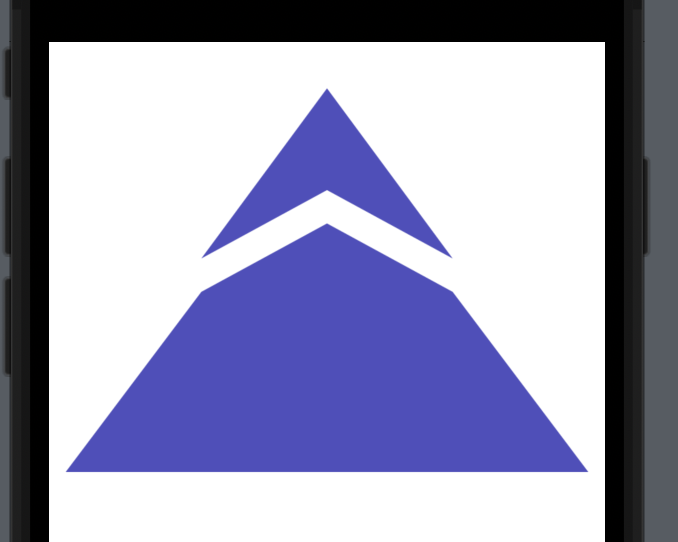
绘制Badge Symbol
- 创建badge视图 BadgeSymbol.swift
swift
import SwiftUI

struct BadgeSymbol: View {

    static let symbolColor = Color(red: 79.0 / 255, green: 79.0 / 255, blue: 191.0 / 255)

    var body: some View {
        GeometryReader { geometry in
            Path { path in
                let width = min(geometry.size.width, geometry.size.height)
                let height = width * 0.75
                let spacing = width * 0.030
                let middle = width * 0.5
                let topWidth = width * 0.226
                let topHeight = height * 0.488
                path.addLines([
                    CGPoint(x: middle, y: spacing),
                    CGPoint(x: middle - topWidth, y: topHeight - spacing),
                    CGPoint(x: middle, y: topHeight / 2 + spacing),
                    CGPoint(x: middle + topWidth, y: topHeight - spacing),
                    CGPoint(x: middle, y: spacing)
                ])
                path.move(to: CGPoint(x: middle, y: topHeight / 2 + spacing * 3))
                path.addLines([
                    CGPoint(x: middle - topWidth, y: topHeight + spacing),
                    CGPoint(x: spacing, y: height - spacing),
                    CGPoint(x: width - spacing, y: height - spacing),
                    CGPoint(x: middle + topWidth, y: topHeight + spacing),
                    CGPoint(x: middle, y: topHeight / 2 + spacing * 3)
                ])
            }.fill(Self.symbolColor)
        }
    }
}

struct BadgeSymbol_Previews: PreviewProvider {
    static var previews: some View {
        BadgeSymbol()
    }
}
import SwiftUI
struct BadgeSymbol: View {
static let symbolColor = Color(red: 79.0 / 255, green: 79.0 / 255, blue: 191.0 / 255)
var body: some View {
GeometryReader { geometry in
Path { path in
let width = min(geometry.size.width, geometry.size.height)
let height = width * 0.75
let spacing = width * 0.030
let middle = width * 0.5
let topWidth = width * 0.226
let topHeight = height * 0.488
path.addLines([
CGPoint(x: middle, y: spacing),
CGPoint(x: middle - topWidth, y: topHeight - spacing),
CGPoint(x: middle, y: topHeight / 2 + spacing),
CGPoint(x: middle + topWidth, y: topHeight - spacing),
CGPoint(x: middle, y: spacing)
])
path.move(to: CGPoint(x: middle, y: topHeight / 2 + spacing * 3))
path.addLines([
CGPoint(x: middle - topWidth, y: topHeight + spacing),
CGPoint(x: spacing, y: height - spacing),
CGPoint(x: width - spacing, y: height - spacing),
CGPoint(x: middle + topWidth, y: topHeight + spacing),
CGPoint(x: middle, y: topHeight / 2 + spacing * 3)
])
}.fill(Self.symbolColor)
}
}
}
struct BadgeSymbol_Previews: PreviewProvider {
static var previews: some View {
BadgeSymbol()
}
}
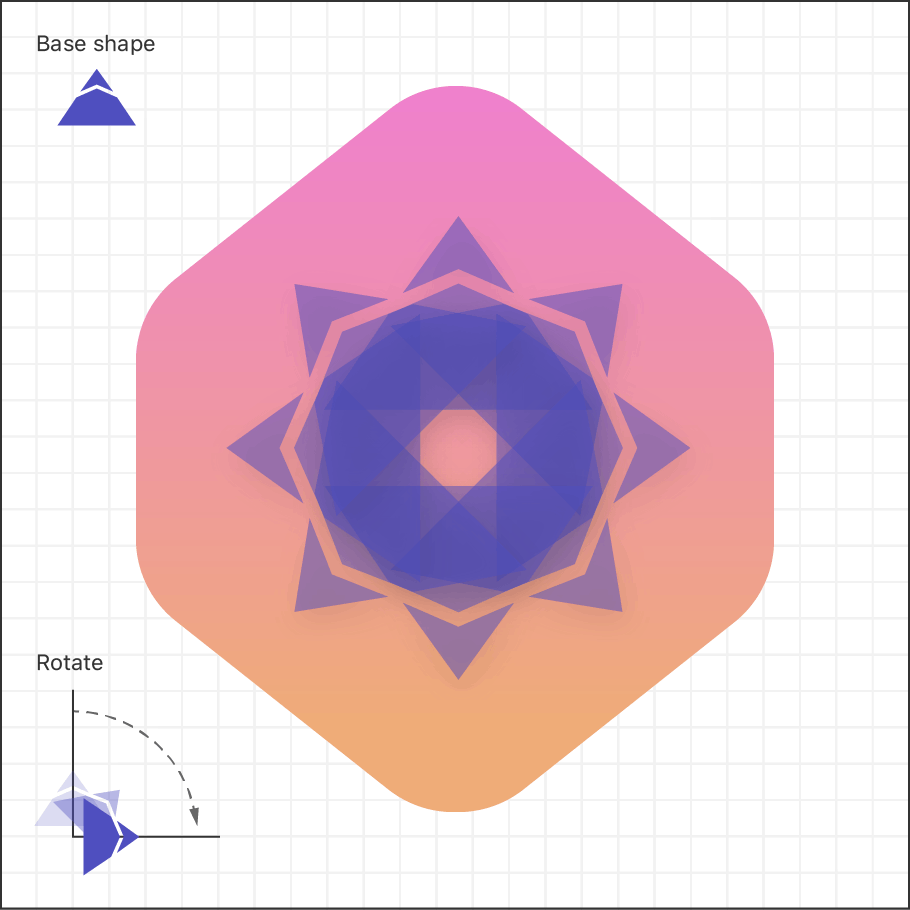
- 旋转视图,创建RotatedBadgeSymbol.swift文件
swift
struct RotatedBadgeSymbol: View {
    let angle: Angle
    var body: some View {
        BadgeSymbol()
            .padding(-60)
            .rotationEffect(angle, anchor: .bottom)
    }
}


struct RotatedBadgeSymbol_Previews: PreviewProvider {
    static var previews: some View {
        RotatedBadgeSymbol(angle: Angle(degrees: 5))
    }
}
struct RotatedBadgeSymbol: View {
let angle: Angle
var body: some View {
BadgeSymbol()
.padding(-60)
.rotationEffect(angle, anchor: .bottom)
}
}
struct RotatedBadgeSymbol_Previews: PreviewProvider {
static var previews: some View {
RotatedBadgeSymbol(angle: Angle(degrees: 5))
}
}合并Badge前景和背景
1). 创建Badge页面
swift
import SwiftUI

struct Badge: View {
    var badgeSymbols: some View {
        RotatedBadgeSymbol(angle: Angle(degrees: 0))
            .opacity(0.5)
    }

    var body: some View {
        ZStack {
            BadgeBackground()
            // 通过读取周围的几何图形(surrounding geometry)和缩放symbol来修正徽章符号的大小
            GeometryReader { geometry in
                badgeSymbols
                    .scaleEffect(1.0 / 4.0, anchor: .top)
                    .position(x: geometry.size.width / 2.0, y: (3.0 / 4.0) * geometry.size.height)
            }
        }
    }
}

struct Badge_Previews: PreviewProvider {
    static var previews: some View {
        Badge()
    }
}
import SwiftUI
struct Badge: View {
var badgeSymbols: some View {
RotatedBadgeSymbol(angle: Angle(degrees: 0))
.opacity(0.5)
}
var body: some View {
ZStack {
BadgeBackground()
// 通过读取周围的几何图形(surrounding geometry)和缩放symbol来修正徽章符号的大小
GeometryReader { geometry in
badgeSymbols
.scaleEffect(1.0 / 4.0, anchor: .top)
.position(x: geometry.size.width / 2.0, y: (3.0 / 4.0) * geometry.size.height)
}
}
}
}
struct Badge_Previews: PreviewProvider {
static var previews: some View {
Badge()
}
}2). 优化图形显示
swift
import SwiftUI

struct Badge: View {
    var badgeSymbols: some View {
        ForEach(0..<8) { index in
                    RotatedBadgeSymbol(
                        angle: .degrees(Double(index) / Double(8)) * 360.0
                    )
                }
                .opacity(0.5)
    }

    var body: some View {
        ZStack {
            BadgeBackground()
            // 通过读取周围的几何图形(surrounding geometry)和缩放symbol来修正徽章符号的大小
            GeometryReader { geometry in
                badgeSymbols
                    .scaleEffect(1.0 / 4.0, anchor: .top)
                    .position(x: geometry.size.width / 2.0, y: (3.0 / 4.0) * geometry.size.height)
            }
        }.scaledToFit()
    }
}

struct Badge_Previews: PreviewProvider {
    static var previews: some View {
        Badge()
    }
}
import SwiftUI
struct Badge: View {
var badgeSymbols: some View {
ForEach(0..<8) { index in
RotatedBadgeSymbol(
angle: .degrees(Double(index) / Double(8)) * 360.0
)
}
.opacity(0.5)
}
var body: some View {
ZStack {
BadgeBackground()
// 通过读取周围的几何图形(surrounding geometry)和缩放symbol来修正徽章符号的大小
GeometryReader { geometry in
badgeSymbols
.scaleEffect(1.0 / 4.0, anchor: .top)
.position(x: geometry.size.width / 2.0, y: (3.0 / 4.0) * geometry.size.height)
}
}.scaledToFit()
}
}
struct Badge_Previews: PreviewProvider {
static var previews: some View {
Badge()
}
}